Greetings to all!
Wow, my last post was almost two months ago. It's definitely time to check in and write an update.
No, I haven't given up on the Duster. After about 9 or 10 months of focusing on nothing but this project, life has sort of caught up with me. I have been pretty busy the past couple of months taking care of MANY other household and career necessities that I had been neglecting. There is never enough time or energy to do everything I want/need to.
Also, I finally had to halt everything car-related and clean out my shop from top to bottom. I have collected so many projects and parts over the past few years that it was becoming nearly impossible to accomplish anything. I was getting seriously frustrated whenever I worked on something because I could never find what I needed - tools, parts, room to work. So, I have sold off a lot of unnecessary stuff and re-organized my workspace so now I can THINK clearly again and actually FIND things.
The Duster is "streetable" but has not left the driveway in quite some time. I am about ready to resume where I left off, especially now that gas prices are creeping up again. My next step is to finish installing the various meters I need to monitor the performance. At that time, I can complete the "fix" on the battery terminals. Then I will be ready for some serious street testing.

Friday, June 5, 2009
Thursday, April 9, 2009
We're Number 1
I'm picking up my replacement battery on the way to work today, so the Duster will be back on the road again tomorrow. In the mean time...
I have a "Ride Page" over at CarDomain.com. Rob Einaudi, Editor-In Chief of CarDomain, likes my car and has written about it several times on his site. The latest article is HERE.
A while back I was looking at the CarDomain categories that my Duster might fit into. Just for the fun of it, I put it into the "Green Machine" category. Today I noticed that we are the "TOP RIDE" in that category. Hey, that's pretty cool!
Sunday, April 5, 2009
Another Setback
Well, I certainly hate reporting the failures, but they are a part of the whole story of this conversion. Maybe the information will help someone else avoid some trouble. The first several mishaps were due to defective parts. The last two failures were totally my fault.
Yesterday during the test driving I smelled a slight burning smell. When I finished driving, I took a quick look around and checked the controller and contactor connections with my infrared thermometer. I didn't see anything out of the ordinary so I attributed the smell to just new parts "burning in". Today I was installing the new Link 10 meter and turned on the main contactor. I immediately heard a "snapping" noise in the trunk. I could also see the unmistakable blue flash of arcing, since there is no back seat in the car.
Upon opening the trunk, I found that one of the battery terminals had gotten so hot that it had melted the lead around the post. I assume this happened yesterday during my two miles of test driving. I am taking the blame for this because I have neglected to check the rear battery terminals for tightness in quite a while. After discovering this, I checked the other terminals on the rear battery pack and found a couple others that were somewhat loose. I believe this one just got too lose to handle all of the current. So I guess this means I'll have to replace the battery since the threads on the post got messed up as well. This is another lesson learned.

Saturday, April 4, 2009
On The Road Again
 I welded and installed the motor coupling adapter today. Then I put the car all back together and did some more successful test driving. I'm still unwilling to stray too far from home until I am certain of its reliability, but I easily got her up to 40 mph in second gear.
Wednesday, March 25, 2009
Back From The Machine Shop
After the motor coupling failure, I designed an adaptor plate and had a local machine shop make it out of steel. Now I can weld the steel hub to the adaptor plate and bolt the whole assembly to the coupling using grade 8 bolts.


Thursday, March 19, 2009
Update On Mechanical Failure
I was able to remove the back half of the motor coupling by removing the transmission. It was not too bad of a job and only took about an hour. I confirmed that the weld was indeed the culprit. I have come up with a couple of options which I will look into tomorrow.


Mechanical Failure - I'm Still Learning
In yet another plot twist, the EV Duster has suffered a mechanical failure. I was working on testing a throttle limitation circuit to keep the car from lurching so much in reverse. I was trying different resistor values and test driving the car forward then reverse in the driveway when something in the driveline snapped. Upon inspection I discovered that the weld holding the machined clutch disk center to the Lovejoy motor coupling broke.
 Well it didn't actually break. It just separated from the Lovejoy coupling. I was quick to blame my amateur welding skills for this failure. However, I have discovered that the failure is much more than that.
Doing some investigation, I have learned that the coupling is made of "sintered' iron. After reading up on sintered iron and calling the Lovejoy factory, I have learned that sintered iron cannot be welded. I guess I was lucky that my weld held as long as it did - perhaps a tribute to my superior welding skills :).
So this is a "design" problem which I am going to have to re-think. The Lovejoy factory told me that a steel version of the coupling "may" be available but at about 5 times the cost. That is prohibitive at this point. Apparently the sintered coupling can be drilled and tapped, so maybe I can fabricate a splined clutch disk center that I can bolt to the coupling. I'll have to think about this a while.
Monday, March 16, 2009
One small step back

I decided to take a step backward today. When I originally installed the motor controller, I forgot to take into account the cooling fans that mount on top of it. I realized some months ago that the fans sat up too high for the hood to close, so I left them off. With all of the other issues I had to deal with, I put off deciding how to remedy this until today.

Today I moved the circuit breaker and controller over toward the middle of the car. In fact, I ended up repositioning just about everything on the control board. The end result is that I now have plenty of clearance for the fans and room for the control relays that I will be installing.
Sunday, March 15, 2009
Dash To The Finish
The last step in completing the tachometer project was hooking the signal wire into my dash tach. I needed to remove the dash to accomplish this. I also needed to make a few other repairs and modifications to my dash. This actually turned out to be a pretty big project.
 First, I removed the old fuel and oil pressure gauges. In addition, I relabeled the water temperature guage to read "CNTRLR". I ran a sensor wire to the controller and was hoping to use the old water temperature sender to pick up the controller temperature. (So far, it is reading way too high so I will need to play with the sensor a bit more.)
I then added indicator LEDs in the dash for the main contactor status, the controller cooling fans, and the throttle control circuit that I will be adding to allow slower throttle response. I also added switches under the dash for the controller fans and throttle control circuit.
In addition to adding indicators to the dash, I picked up a few circuits at the dash that will be needed for the various controls and brought them out to the control board under the hood.
 Before I knew it, I had run quite a few new wires. I finally hooked everything back up to the dash and reinstalled it. I then tested everything including the tach. Finally, I tucked all of the loose wires under the hood and test drove the car to make sure everything still works as it should. Now I can work on completing the necessary control circuits.
Monday, March 9, 2009
Tach Attack (The Final Chapter)
I originally figured out the basics of how I was going to get a signal from the motor to my in-dash digital tachometer back in October. That post is here. I promised a "final chapter" so here it is.
I have now implemented that plan and have a working tach. I first decided to make life easy and pulled 9 batteries out of the front of the car. This gave me good access to the front of the motor.
 The pieces I used to generate the tach signal were all removed from a 70's era Mopar distributor that I had in my stash of Muscle Car parts. This was the easiest and cheapest solution to the problem, since a distributor similar to this one was successfully generating the tach signal while the internal combustion engine was in the car. Figuring out how it did that was actually pretty simple.
 I just replicated the sensor configuration from inside the distributor onto the front motor shaft. Proper alignment was pretty critical here so I am glad I took the time and effort to remove some batteries. One modification I had to make was to grind off four of the teeth from the sensor gear.
 This was necessary because the gear originally generated 8 pulses per revolution of the distributor. An internal combustion engine has two revolutions per one revolution of the distributor. Therefore, four pulses equates to one revolution of the engine (or electric motor). The gear also needed to be bored out slightly to fit on the motor shaft.
 Once the sensor unit was satisfactorily mounted, I connected it to the original ECU (electronic control unit). This unit was necessary to properly process the pulses generated by the sensor into something able to be read by the tachometer.
 Of course I wanted to test it before lifting 600 pounds of batteries back into the car. I disconnected the motor from the controller and hooked up a 12 volt car battery to it - the same way I originally tested the motor. I connected a spare tachometer to my accessory 12v battery.
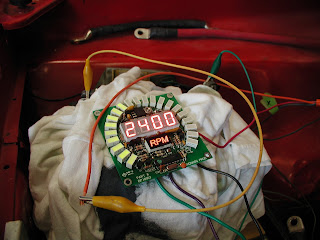 The test was a success. All I have to do now is run the sensor wire to the in-dash tach.
Pedal To The Metal (Not Quite)

My stock accelerator pedal is used to control motor speed via a potentiometer, commonly referred to as a throttle box (seen here after the recent fire). I inadvertently discovered that my accelerator pedal was not transferring full range of motion to my throttle box. During my earlier resto-mod of the Duster, I had purchased some thick, custom "Mopar" floor mats. I had these out of the car when I originally installed and tested the throttle box.
Sometime later, I put the floor mats back into the car. I didn't even think twice about sliding the mat under the accelerator pedal the way it was designed to fit - not realizing that it was impeding full travel of the throttle box lever. This means that my recent test drives were all done using about 3/4 of the available throttle travel! Wow, I was pretty satisfied with the performance of the car during my test drives. Now that I have removed the thick floor mat enabling full throttle travel, I expect performance will be even better. Cool!
Saturday, March 7, 2009
What's Left?
I am definitely seeing the light at the end of the tunnel. The satisfactory completion of this project finally seems within my grasp, barring any unforeseen occurrences. So what is left to do?
- Install tach sensor unit to front motor shaft and wire to dash gauge.
- Install temperature sensor on motor controller and wire to dash gauge.
- Install dash indicator light to show when main contactor #2 is engaged.
- Install and wire two 12 volt controller cooling fans.
- Wire up safety interlock relays for high voltage power up (foot brake ON & emergency brake OFF). (Also, emergency brake ON = high voltage power off.)
- Install automatic/manual switch to insert resistor in parallel with throttle circuit. (will make backing up less jerky and allow smooth very slow forward speed if necessary).
- install and wire 26 digital volt meters to monitor individual batteries.
- Rework or rebuild battery restraint system to keep high voltage pack isolated from the car chassis.
- Reinstall and program Link 10 battery monitor.
- Construct a dedicated 20 amp cable for either 120 or 240 volt charger input.
Xantrex Link 10 Meter Problem Solved
I decided to quit waiting around for Xantrex to contact me about my broken meter and gave their tech support line a call Thursday. I must say that they worked very hard to take care of my issue. The problem is that the Link 10 is no longer made - or replaced - or repaired. There are no longer any in stock at Xantrex. In addition, there is no equivalent meter being made, since the Link 10 is the only meter able to measure more than about 36 volts because it uses a pre-scaler. In other words, there is no other meter like it; and it has been discontinued.
To make a long story short, Xantrex told me that if I found a distributor somewhere that still had one in stock, they (Xantrex) would try to trade the distributor a more expensive Xantrex product for the Link 10. I was lucky enough after an online search and several phone calls to locate Marysville Marine in Tennesee. They still had a Link 10 in stock and were very easy to work with. They were receptive to Xantrex's proposal and my replacement meter will be sent out from Marysville Marine on Monday.
So at least for the time being, I will not have to re-think or re-wire my instrumentation. Hopefully this meter works and will never need replaced.
Thursday, March 5, 2009
Progress
I worked on correcting a few issues today. I pulled the right rear tire and bent the wheel well lip in a bit - tire rubbing problem solved. Gaining front wheel clearance was a bit more difficult. First, I cranked up the torsion bars to raise the front end a little. Then I pulled both front wheels and took a sawzall and die grinder to the battery support braces. That solved the turning clearance problem.
 Next, I took the old gas filler tube, cut off the end where the gas cap mounts, and welded on a couple of small tabs to mount the charger plug. Now the plug is hidden nicely behind the gas cap.


 Next, I took the old gas filler tube, cut off the end where the gas cap mounts, and welded on a couple of small tabs to mount the charger plug. Now the plug is hidden nicely behind the gas cap.


Wednesday, March 4, 2009
More Success! Plus Video!!!
I put the Duster through some more strenuous testing today and it performed very well. More about that in a moment.
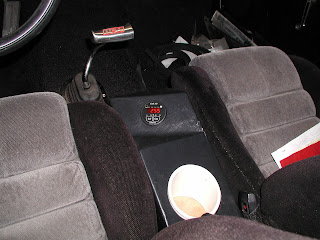
I suffered a small setback the other day before my first test drive. My Link-10 meter broke before I even got to use it. I spent $339 on this wonderful piece of equipment (with accessories) to monitor everything about my battery pack and the car's performance (volts, amps, amp hours consumed, KWH, time remaining). I even built a cute little console (with cup holder) to house the instrument.
 After it broke (for no apparent reason) I did a little checking in the on-line forums and discovered that it is pretty common for these to break or lock up - even by just putting power to them in a way they "don't like". Great, more stuff learned the hard way! Well, I really need to monitor the performance of the battery pack, especially during testing, so I can tell how hard I am pushing it. So I thought I might just purchase a replacement to use while I send this one back to get repaired. I went on-line to check prices only to find out that the Link-10 has been discontinued as of about a week ago. Yes, this is exactly how I have come to EXPECT things to go on this project. I have contacted the company on-line for product support but have not heard back from them yet. See one of my older posts for my rant about the lack of customer service I have experienced during this whole endeavor. I don't think I will hold my breath. I do think I will have to come up with something different for instrumentation.
Anyway, I decided to go ahead with the test driving without metering anything. I just won't be able to push it to the limits until I solve the instrumentation problems. Today, I drove up and down my street more aggressively and even took it around the block. I probably put a total of about 2 miles on it, reaching a speed of about 38 mph. Each successful drive boosts my confidence in the controller a little more. Although I still have visions of it exploding.
What I noticed during the test drives:
- Acceleration is not near as good as it was with the 360 cid V8 I replaced. (Ha, no surprise there).
- Shifting is natural and easy without the clutch, as expected.
- It accelerates from a stop best in first gear. I had actually expected second gear to be best because of the motor torque curve. I guess the extra weight of the car overcomes the instant torque.
- One rear tire rubs on the wheel well lip. This is an easy fix with a hammer.
- The front battery rack supports rub the front tires when turning full in either direction. This is an easy fix with a grinder.
- There is quite a bit of rattling - probably because the steel battery restraints are still loose from temporarily addressing the problem of pack voltage leaking to the car chassis.
- I do not yet have a feel for how fast it will go. I need a tach and an ammeter before I push it much harder.
- I do not yet have a feel for how far it will go. The short drives I have made did not use much of the battery capacity, which seems to bode well for the range.
- Braking is very good. I did not really "feel" the extra weight - even when braking hard.
Thursday, February 26, 2009
SUCCESS!
 The new motor controller is installed and the road test has been successful!
I first put the car on jack stands and did extensive "driveway" testing. I ran through all of the gears numerous times, including reverse. I took it up to 55 mph on the speedometer and held it there for a while. I did numerous shut-downs and component inspections.
I was satisfied with the results so I took the car out on the street. I didn't push it too hard but I put on about a mile going to the corner and back several times, as I didn't want to have to push it too far if it failed again. On the final run, I quickly went through all the gears and got it up to 28mph before letting off.
Not wanting to spoil this long-awaited successful moment, I decided to call it a day at this point and parked the car. I then did a final check for excessive heat on the components and connections, which all looked good.
If you've read the posts leading up to this one, you have a sense of how much this success means to me at this point. Rather than chance ruining the moment, when I was finished checking everything I PUSHED the car the final 10 feet into the shop. LOL
More rigorous testing will follow. However, the weather is turning colder again and I have to return to work tomorrow, so I may savor this success for a week or so before I do any more driving :)
Thursday, January 29, 2009
Controller Update
I spoke with Jim, the owner of LogiSystems this afternoon and thoroughly discussed my controller issue. First I will say that Jim has always been very polite, straight forward, and accessible through all of their problems. I have also heard this same thing from quite a few others who have called him about their failed controllers. I truly believe that he has the same goal as I do, which is to have a working controller in my car. I feel no need to be irate with him over this situation.
He did a post-mortem on my controller and found that it had a catastrophic failure. Duh! He said that it was the most badly damaged controller he has seen, even among the ones they have deliberately failed as test units. He did learn that the control board that was the source of the prior LogiSystems problems had not failed - which is a bit of good news I guess. He said that about 100 defective controllers had been repaired with no failures except mine. I have heard of no other failures and several other successes with the repaired controllers, so I do believe him. My controller was too badly damaged to know exactly what went wrong, but he said it looked like a direct short of full battery voltage/amperage across the main busses - which should be impossible in the controller.
At his request, I had also sent him a copy of my wiring diagram. He said the diagram was great and we discussed several aspects of my wiring with respect to how the controller works. We agreed that there should be no reason for this type of failure due to my wiring. So the end result is that we really have no idea what actually went wrong - not such good news. I was hoping for a definitive answer to this problem.
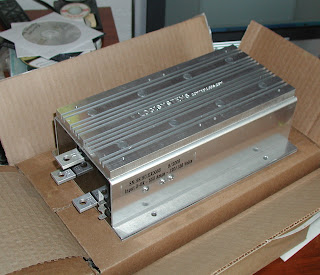
At this point, my thought is that if mine is the only repaired controller that failed, that is only a 1 percent failure rate among the prior defectives, and a much lower failure rate among all controllers they have shipped. This failure rate can probably be expected. I am going to assume that I am just the unlucky bastard who got a bad component or some other unfortunate defect with the last controller. I will further assume that the replacement unit will work as expected. I requested last week that they upgrade my controller to a 750 amp version, which they did and it was shipped out today.
So, I will put on my steel underwear and give Logisystems another try. Perhaps I should sell tickets this time and make an event out of it. In addition to getting my fire extinguisher refilled, I should probably pick up a fire suit and helmet for the next test drive.
He did a post-mortem on my controller and found that it had a catastrophic failure. Duh! He said that it was the most badly damaged controller he has seen, even among the ones they have deliberately failed as test units. He did learn that the control board that was the source of the prior LogiSystems problems had not failed - which is a bit of good news I guess. He said that about 100 defective controllers had been repaired with no failures except mine. I have heard of no other failures and several other successes with the repaired controllers, so I do believe him. My controller was too badly damaged to know exactly what went wrong, but he said it looked like a direct short of full battery voltage/amperage across the main busses - which should be impossible in the controller.
At his request, I had also sent him a copy of my wiring diagram. He said the diagram was great and we discussed several aspects of my wiring with respect to how the controller works. We agreed that there should be no reason for this type of failure due to my wiring. So the end result is that we really have no idea what actually went wrong - not such good news. I was hoping for a definitive answer to this problem.
At this point, my thought is that if mine is the only repaired controller that failed, that is only a 1 percent failure rate among the prior defectives, and a much lower failure rate among all controllers they have shipped. This failure rate can probably be expected. I am going to assume that I am just the unlucky bastard who got a bad component or some other unfortunate defect with the last controller. I will further assume that the replacement unit will work as expected. I requested last week that they upgrade my controller to a 750 amp version, which they did and it was shipped out today.
So, I will put on my steel underwear and give Logisystems another try. Perhaps I should sell tickets this time and make an event out of it. In addition to getting my fire extinguisher refilled, I should probably pick up a fire suit and helmet for the next test drive.
Friday, January 23, 2009
FAIL


LogiSystems controller #2 blew up causing a small fire. There was no damage to the car or other components.
Honestly, I don't even know what to say at this point. Words cannot adequately express the array of emotions I am feeling. After all of the hard work, long hours and money I have spent on this project, all I have built is "character" - which is precisely what I need to rely on at this moment.
Wednesday, January 21, 2009
I Have Control
Two months to the day after blowing up my LogiSystems motor controller, the repaired unit has finally returned to me. In recent conversations with LogiSystems and in the blogosphere, I have heard of no failures and a couple of successes with the latest round of repaired controllers, which is certainly encouraging. Hopefully all of the company's controller issues have been worked out and I can now get the Duster on the road to do some serious test driving.
 I have to work the last of 7 midnight shifts tonight and then have several days off. The weather will be warm tomorrow so I plan to reinstall the controller and see what happens.
 I have to work the last of 7 midnight shifts tonight and then have several days off. The weather will be warm tomorrow so I plan to reinstall the controller and see what happens.
Subscribe to:
Comments (Atom)